How To Sharpen A Kitchen Knife At Home
A practical step-by-step guide to how to sharpen a kitchen knife at home, including preparation, instructions, common issues, tips, and next steps.
How To Sharpen A Kitchen Knife At Home
Sharpening a kitchen knife at home is a practical skill that keeps your blades safe, efficient, and pleasant to use. This guide walks you through the process using a whetstone, from preparing your work area to performing a final polish. You will learn the correct angle, use of water, and testing methods to achieve a razor-sharp edge. Clear steps and troubleshooting advice help you avoid common mistakes, and advanced tips offer ways to refine your technique further.
Fast Answer
- Soak your whetstone in water for 10–15 minutes, then place it on a damp cloth or non-slip mat to keep it steady while you sharpen.
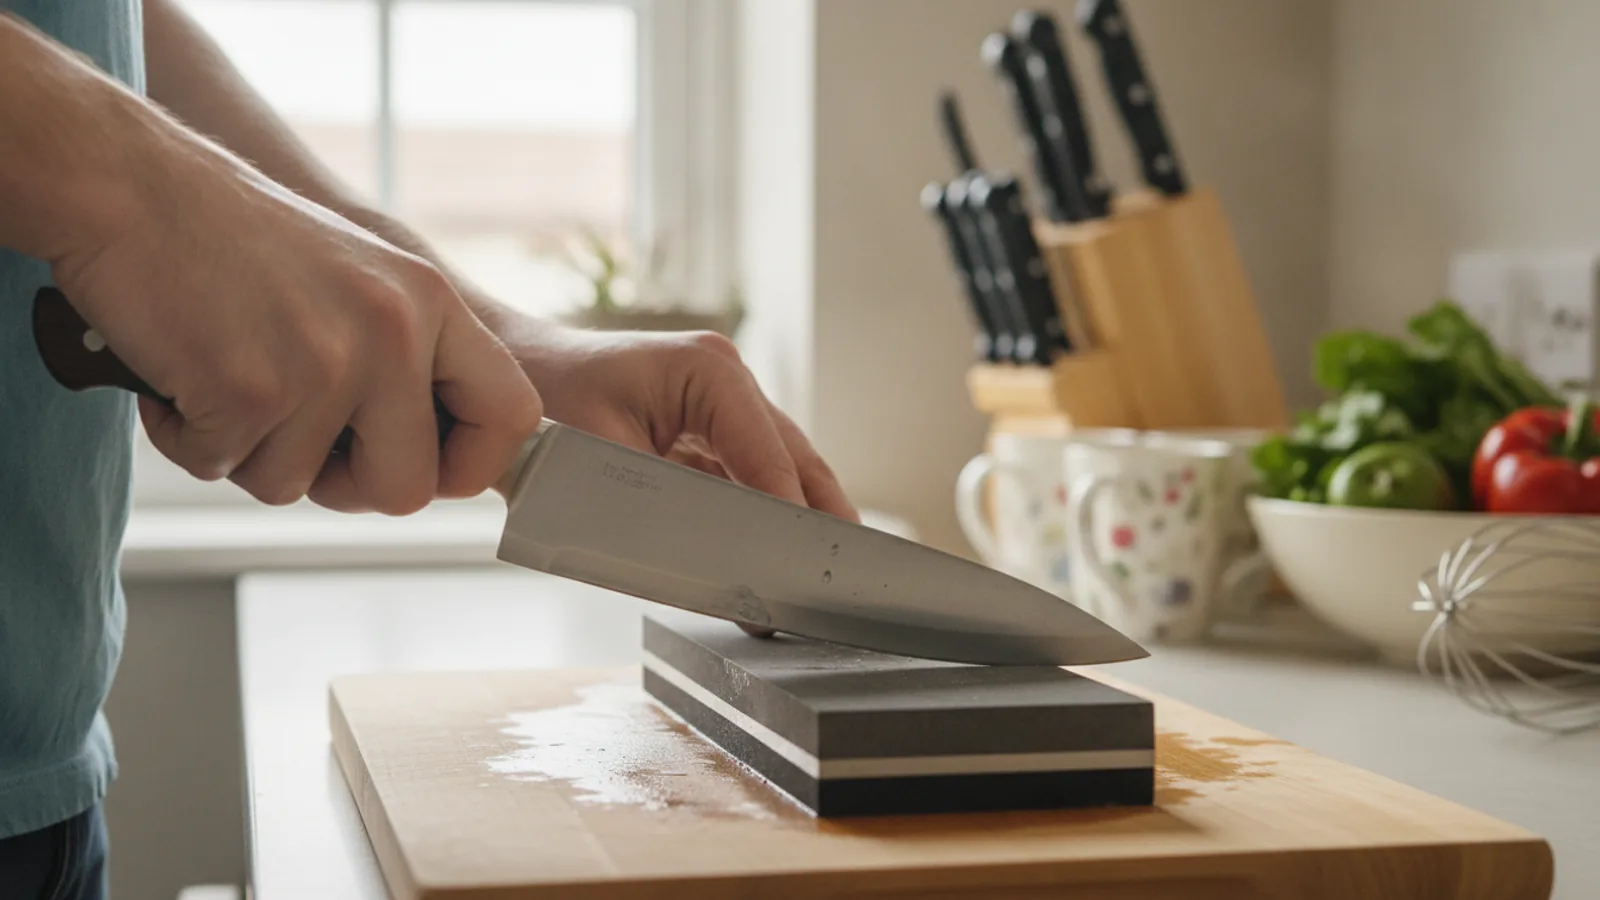
- Hold the knife at a 20-degree angle against the medium grit side and push the blade across the stone in a sweeping motion, alternating sides evenly.
Before You Start
- Get a medium-grit whetstone (around 1000 grit) and a fine-grit whetstone (around 6000 grit) for sharpening and polishing.
- Fill a shallow pan or container with water and soak the whetstone for 10–15 minutes until no air bubbles rise, ensuring proper lubrication.
- Place the soaked stone on a damp folded towel or a non-slip rubber mat to prevent it from sliding during use.
- Have a clean, dry cloth or a leather strop ready for polishing, and a pair of safety gloves if you prefer extra hand protection.
Step-by-Step Instructions
Prepare Your Work Surface and Soak the Stone
Clear a table or counter that has enough room for the whetstone and your knife. Place a damp folded towel or a non-slip mat under the stone so it stays firmly in place while you work. If you are using a water stone, submerge it in water for about ten to fifteen minutes. You will know it is ready when no more air bubbles escape from the stone. While waiting, gather your knife and a clean cloth. Choose a comfortable height so your wrist and shoulders are relaxed. Check the stone for cracks or uneven areas; a smooth, flat surface is essential for even sharpening. If the stone is new, you might need to level it with a flattening stone as per the manufacturer's instructions. Once it is soaked, place it with the coarse side facing up. Position the knife so your dominant hand holds the handle and your other hand presses the blade flat against the stone. You are now ready to begin the sharpening strokes.
Find the Correct Sharpening Angle
Most kitchen knives require a sharpening angle between fifteen and twenty degrees. You can estimate this by placing a piece of folded paper under the blade; a single sheet is about twenty degrees. Hold the knife so the blade is flat against the stone, then tilt it up until the edge meets the stone at the desired angle. A good way to visualize the angle is to think of a 45-degree angle and then half it. Some knives have a slightly wider angle for durability, so check the manufacturer's guidance if you know it. Once you have set the angle, try to maintain it for every stroke. Your wrist should stay rigid, and your body should pivot from your shoulder to keep the motion smooth. A consistent angle is the secret to a straight, even edge. You can practice holding the angle without the knife by using a marker to tint the edge and then making a few strokes to see where the stone removes the ink.
Sharpen on the Coarse Grit Side
Start with the coarse side of the stone. Lay the knife flat on the stone at your chosen angle, then press gently while pushing the blade forward in a sweeping motion from the heel to the tip. Imagine you are slicing a thin layer off the stone. As you reach the tip, lift the handle slightly to keep the edge in contact. Repeat this motion about ten to fifteen times on one side. Then flip the knife and perform the same number of strokes on the other side. Be careful not to rock the blade; keep the angle fixed. After each set, run your thumb lightly along the edge (from the spine side) to feel for a burr, which feels like a rough lip. When a burr appears along the entire edge, you have sharpened that side enough. This burr indicates that metal has been pushed to the opposite side, meaning you have formed a new edge. Try to create a consistent burr along the whole length before moving to the next step.
Refine the Edge on the Fine Grit Side
After the burr forms, flip the stone over to the fine grit side. Repeat the same sweeping strokes, but use a lighter touch. The fine stone removes the burr and polishes the edge to a razor sharpness. Start with about ten strokes per side, then begin to alternate strokes on each side after each one or two strokes. This alternating method helps ensure an even edge. Continue until the burr is gone and the edge feels smooth. You can check by lightly running your thumb across the edge perpendicular to it, but never press hard. Another test is to gently shave a piece of paper or a tomato; a sharp knife will catch immediately. If it does not, repeat a few more fine passes. Be patient and avoid pressing too hard, as this can fold the delicate edge. The fine grit side is where you turn a sharp knife into a polished, refined cutting tool.
Hone the Edge with a Leather Strop
Stropping is the final step to align any microscopic burrs or rough spots left by the stone. A leather strop is a piece of leather mounted on a wooden block. To use it, hold the strop firmly on the counter with the leather side up. Apply a small amount of honing compound if you have it, but you can strop without it. Then, pull the knife backward across the leather, keeping the blade at the same angle as before, but with the edge trailing behind the spine. Start from the heel and pull toward you, so the edge moves backward against the leather. Do this about ten times on each side. This cleans the edge and gives it a final polish. A strop is not for removing metal but for refining the edge. If you do not have a strop, you can use a clean denim cloth or an old leather belt. After stropping, you should have a very sharp, durable edge that will slice well.
Test the Sharpness and Clean Up
Before declaring the knife ready, test its sharpness with a few safe methods. The paper test: hold a sheet of paper in one hand and attempt to slice it with the knife. A sharp blade will cut smoothly without tearing. A tomato test: press the blade lightly against a ripe tomato and pull it through the skin; it should sink in easily. Never test sharpness by running your finger across the edge, even if you feel confident. Once you are satisfied, clean the knife thoroughly under warm water with a mild soap, then dry it completely with a towel. Take care of the whetstone by rinsing it and letting it air dry. Store the stone in a safe place where it will not chip. Always store the knife in a block, on a magnetic strip, or with a blade guard so the edge does not dull. With practice, this entire routine will take about ten to fifteen minutes and will keep your kitchen knives in excellent condition.
Quick Reference
| Situation | Action | Why it helps |
|---|---|---|
| The knife still feels dull after you have sharpened it on both grit sizes. | Repeat the process on the fine grit stone, but increase the number of strokes by five on each side, and make sure you are maintaining the correct angle. | A prolonged burr or incomplete sharpening can leave the edge rounded; additional passes with light pressure will finish the job. |
| You notice that one side of the blade is more worn or nicked than the other. | Spend extra strokes on that side only, using the coarse grit, until the edge becomes even before moving on to the fine grit. | Balancing the edge ensures that both bevels meet at a central point, giving you a consistent and strong cutting edge. |
| Your whetstone is new and has a rough or uneven surface. | Level the stone with a flattening stone or a piece of wet-dry sandpaper laid flat on a glass plate, following the grit recommendations for your stone. | A smooth, flat stone is essential for even pressure and a consistent angle; otherwise, you will create an uneven edge. |
Common Issues
- You cannot feel a burr after many strokes on the coarse stone.: Increase the angle slightly (about 5 degrees) and press a little harder. Also, check that you are sharpening the entire edge, especially the heel and toe, by using a sweeping motion.
- The edge becomes wavy or uneven after sharpening.: Remain patient and focus on maintaining a consistent angle throughout each stroke. Use a slower, deliberate motion and avoid rocking the blade. If needed, start again on the coarse stone to correct the bevel.
- The knife is sharp but chips easily when cutting.: Your edge may be too acute or you might be using a slicing motion with too much lateral pressure. Try sharpening at a slightly higher angle (around 20 degrees) to give the edge more strength, and avoid cutting on bones or hard surfaces.
Advanced Tips
- For a mirror-polished edge, use an ultra-fine stone (8000 grit) after the fine stone, then strop with a chromium oxide compound.
- Learn to feel for a burr using your fingertips; with practice, you will be able to tell the exact moment when the edge is ready without visual inspection.
- When sharpening serrated knives, use a dowel or sharpening rod specifically designed for serrations, sharpening each gullet individually at the same angle as the factory edge.
Final Checklist
- Ensure your whetstone is soaked and your work surface is non-slip before you begin.
- Maintain a consistent angle of 15–20 degrees throughout all sharpening strokes.
- Check for a burr on both sides before moving from coarse to fine grit.
- Clean and dry the knife, and store it properly after sharpening to protect the edge.
FAQ
How often should I sharpen my kitchen knives?
It depends on how often you use them and what you cut. As a general rule, touch up the edge with a honing rod or fine stone every few weeks, and do a full sharpening with a whetstone every two to three months for regular home use. If you notice that slicing a tomato takes more pressure than usual, it is time to sharpen.
Is it necessary to use both a coarse and a fine whetstone?
Yes, for best results. The coarse stone (about 1000 grit) quickly removes metal and repairs the edge, while the fine stone (about 6000 grit) polishes and refines it. Skipping the fine stone leaves a rougher edge that is less sharp and doesn't last as long. If you only use one stone, choose a medium (3000) grit as a compromise.
Can I use a steel rod instead of a whetstone to sharpen?
A steel rod, or honing steel, is meant for realigning the edge between sharpenings, not for removing metal. It does not sharpen a dull knife but keeps a sharp knife in good shape. For knives that are truly dull, you need a whetstone or a mechanical sharpener that removes metal.